Please install the IDS Software Suite with the camera drivers on your system before connecting a uEye camera (models with UI-xxxx).The latest software is available for download at https://en.ids-imaging.com/downloads.html. Choose the option "Complete" to install the drivers for USB and GigE uEye cameras.
Detailed information on connecting and operating uEye cameras can be found in the "Installation and connection" chapter in the IDS Software Suite manual.
|
You need administrator privileges to install the software. |
Connecting a USB or USB 3 uEye camera
|
When you connect a new USB device with a Windows PC or a new USB port for the first time, Windows Updated searches automatically online for a driver. This process may take some time depending on your system. |
Connect the USB oder USB 3 uEye camera to the PC using a USB cable. USB or USB 3 uEye cameras can be connected to a USB port either directly or via hubs and repeaters. The Windows plug and play manager recognizes the new hardware.
When you connect a USB or USB 3 uEye camera with a Windows PC or a new USB port for the first time, it is detected as a new device and the firmware is uploaded to the camera. The boot process for USB 2.0 camera is two-tier in contrast to USB 3.0 cameras. When the camera has been correctly installed, the LED on the back of the camera lights up green.
|
To use maximum bandwidth, we recommend connecting the cameras directly to the USB ports on the mainboard. USB ports on PCI/PCIe cards and the USB ports on the front of the PC mostly supply lower bandwidths. |
|
Note: When using a USB hub with external power supply the camera LED still may light green even if the data connection between the PC and the USB hub is interrupted after the camera driver was loaded completely. |
Connecting a GigE uEye camera
Check the power supply to the camera. Connect the camera to a Gigabit Ethernet port on the PC either directly or using switches. Please read the following notes before setting up.
Cabling
•The data network and the camera network should be cabled separately. Therefore, it is recommend connecting the cameras by a separate network card.
•It is recommend to use Cat5e type cables.
•The cable length of the individual segments must not exceed 100 m. A segment is a continuous cable connection between two network devices (e.g. PC, camera, switch).
•It is recommended to cable the network throughout at 1000 Mbit/s.
Network card
•To ensure optimum performance of the network connection, you need to install the latest drivers for your network card.
•GigE network adapters for PCI slots are limited in its transfer rate to approximately 80-90 MByte/s.
•It is recommended to set the "Receive Descriptors" in the network card settings to the maximum value.
•It is recommended to set the "Jumbo Frames" (also: Jumbo Packet) in the network card settings to the maximum value.
Note that the connection between the camera and the PC must continuously be able to transport jumbo packets to ensure the transmission of the jumbo packets. Information on these settings is provided in the manual supplied with the network adapter.
|
If a new software version requires a new firmware, you can update it with the IDS Camera Manager. Updating the firmware can take up to 20 seconds. It is important not to disconnect the camera from the PC or power supply during this time. Otherwise, malfunctions could occur in the camera. The firmware programming status is indicated by the IDS Camera Manager and by the camera's status LED. |
|
If you have initialized the camera with a driver version earlier than 3.40, you need to update the camera firmware manually using the IDS Camera Manager. Driver versions 3.40 and higher support automatic firmware updates. |
IP configuration of a GigE uEye camera
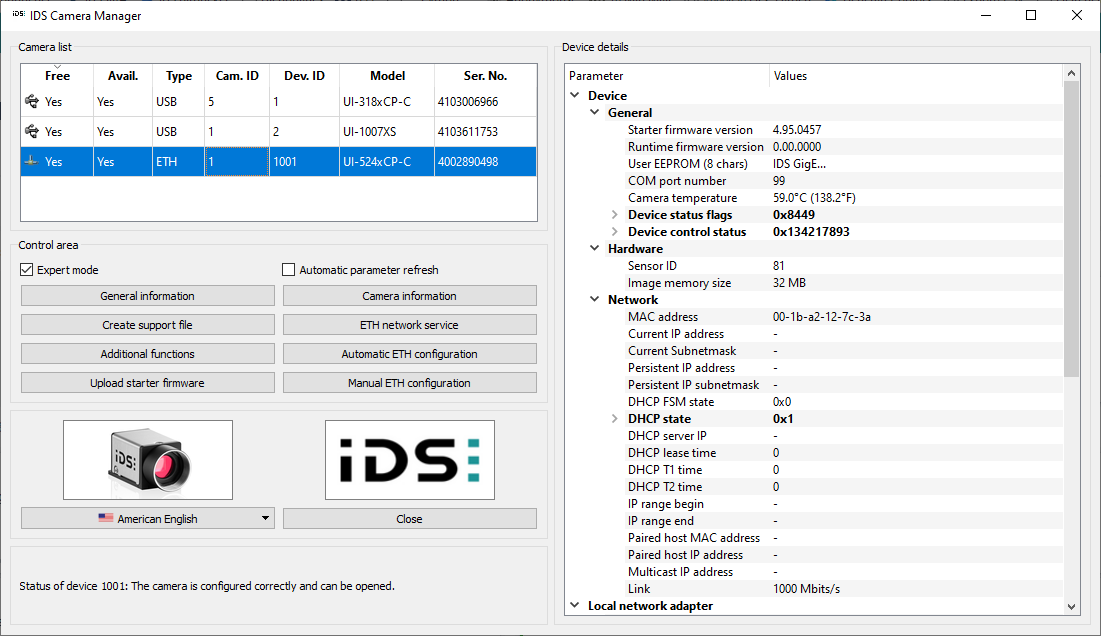
Before you can use the GigE uEye camera on the network, you need to assign an IP address to the camera. The IP address is assigned in the IDS Camera Manager. The IDS Camera Manager can be accessed as follows:
•Start > Programs > IDS > IDS Camera Manager
•Start > Control Panel > IDS Camera Manager
|
•The cameras and the computer must be on the same subnet. •The network card on the host PC responsible for data transfer to and from the GigE uEye cameras requires a persistent (fixed) IP address. It cannot obtain an IP address from a DHCP server. •If a DHCP server is running on the network, you need to ensure when configuring the network card that the manually assigned address range of the camera driver is outside the DHCP range. In this case it is recommended to do the IP configuration of the camera manually ("Manual ETH configuration" function in the IDS Camera Manager). |
In most cases it is sufficient to use the "Automatic ETH configuration" button in the IDS Camera Manager to configure a camera. To configure the GigE uEye camera's IP settings manually, the IDS Camera Manager offers the function "Manual ETH configuration" in expert mode.
|
Multicast mode If you want to enable the multicast mode for a GigE uEye camera, you must set a persistent IP address for the camera. |

Fig. 2: IDS Camera Manager in expert mode

